Showing posts with label Eleonora gown. Show all posts

Wednesday, June 1, 2016

Madder and garters

 I decided to try my hand at natural dyeing some yarn. I used Dharma Trading' s ground madder with an alum mordant and this tutorial from their site.  I didn't buy nearly enough dyestuff and wasn't able to get enough of my wool dyed consistently the same color to do stockings with it as I intended. I do like the color since I adore oranges and this has a definite rusty orange to it.  And it is certainly right smack in the middle of the color madder is supposed to give. I ended up with a lot of slightly different, yet very pretty shades, so small projects are now the order of the day.

Conveniently, I had the perfect small project in mind: garters. I have done several types of garters over the years: macrame, blackworked bands, tablet woven, and strips of silk, I have also tried buckled ones of leather and random bits of ribbons and tapes grabbed at the last minute. They tend to slip down if I have them comfortable enough to wear without worrying about blood clots forming in my legs, untie, or just be too tight, so I have yet to find the perfect garter for me. I read rave reviews from people who had tried out knitted ones. There was much exclaiming of "They don't call it garter stitch for nothing!" So I decided to give it a shot. Thanks to the research of Daniel Rosen (Old England Grown New) and Christine Carnie of  The Sempster, I found two extant pieces to base my garters on. The Sempster's link will take you to her Facebook album on 16th century garters with the pair she knitted for Daniel as well as pictures of a fragment in the Museum of London (object number NN18752, dated 1500-1599. It is not part of their digital collection) and a garter found in Haddon Hall in an account book dated 1632. The Haddon Hall garter is about 1 1/2 inch wide and the Museum of London fragment has a large variety but is close to 6/8 of an inch, according to Ms. Carnie. She examined the Museum of London's piece up close but only was able to see the Haddon Hall through the glass case.

If you have a look at those pieces you'll notice they are pretty utilitarian and nothing like the patterned set of knitted silk garters done in the round with gorgeous tassels found at the MFA.  Those are still on my list but nothing that complex is going to fit into the project schedule this go around. Nor are my knitting skills quite there. There doesn't seem to be an end treatment on the Haddon Hall garter so I decided not to justify my normal tendency to over do things and to just go for plain bands. Back and forth and back and forth and back and forth and back and forth.  Sportweight  yarn, 6 stitches per row.

This is one of the most tedious things I've ever done. I took them as my project over Memorial Day weekend camping with the kids. So there was plenty of time in the car and while sitting around to work on them. I'm not sure I would have got them done nearly as quickly if I had other distractions and the ability to switch to something more exciting.  But they do have a lot of grip and a lot of stretch so I am hopeful they will be a good idea.

Tuesday, May 10, 2016

Venetian turpentine and boiled linseed


The strange brewing of substances for sticking wool to silk continues.  I am trying to use the recipes from the De Kethan Treatise/Sloane manuscript 345 as those are specifically described as being used for printing fabrics. They are called "assays" in the manuscript which is encouraging as "assays: are a term otherwise used as a preparatory layer for gilding with leaf metal. It certainly sounds promising and like the sort of thing I should be using. It also has the advantage of being a later manuscript, dated to the late 15th century and therefore relatively close to the time period I am aiming for. The recipe I am planning to use is a combination of boiled linseed oil, amber and colophony. Colophony is also called Greek Pitch and is a resin. The most easily accessible source of it modernly is bow rosin. I played violin all the way through college. I can tell you that there are few things quite as sticky as this stuff. It can also be found in soaps, shoe waxes, and glues.

The recipe: ‘Substancie tmaken daer alle verue in dinet Recipe .j. lb. Lyn olijs ende sidet een vre ende dan nemt (fol 25r) .viij. loet bernsteen ghepuluert, ende doen dy yn een erden poot ende ghiten dar op lyn olij dy voer gesoden is dat dy wynsteyn bedowen ys myt den olij ende laten dat syen en also langhe dat di bernsteen ghesmonten ys ende roret weel omme myt eyn yseren leppel. Ende als gesmouten ys dy bernsteen soe salment syghen doer een doeck ende doent totten irsten olij ende latent siden, ende pruuet op eyn leye of het sterck genoch sy Ende ist sterck genoch soe doet dar .4. (of 1)pontspigel hars yn ende latent syden een luttel ende dan so settet af, ende dan ys bereyt. 

from Braekman, W. L. Medische en technische Middelnederlandse recepten. Secretariaat van de Koninklijke academie voor Nederlandse Taal- en Letterkunde, Gent, 1975

‘To make substance that serves all paints Collect 1 pound of linseed oil and cook it for one hour. Then take (fol 25r) 8 lot pulverized amber, and put it in a clay pot and pour on it linseed oil that has been cooked so the amber is covered with the oil and leave it to cook until the amber is melted and stir it well with an iron spoon. And when the amber is melted one should sieve it through a piece of cloth and put it with the first oil and leave it to cook, and try on a piece of slate if it is strong enough. And when it is strong enough add 4 (or 1) pound of colophony and leave it to cook a little and then put it off (the fire), and then it is prepared’

Translation by Indra Kneepens in her thesis "Understanding historical recipes for the modification of linseed oil: an experimental study into the properties of modified linseed oil for use as binding media in early northern European panel painting."

In addition to having been mentioned as an ink for printing fabric, and discussion that it tended to be so viscous that it had to be thinned to use to paint with, and it being from the right ballpark time, Ms Kneepens also did extensive experimentation with this oil as part of her thesis. So, I decided that this was the oil for me to try on my crazy experiment. The only issue at all is the expense. Amber-colophony varnish is commercially available at $144 plus shipping for 30 ml. OUCH. Buying amber to burn and make my own is also a bit costly for an experiment, but i am currently shopping around.

I do have some other things going as other options though. I started some glovers size with leather scraps from the leather jerkin and ordered some Venetian turpentine. There was specific mention in the discussion of the 17th century flocked wall papers that the glue used for the flocking was ant-pest because it contained turpentine. I wondered about this a lot since turpentine is used for things like cleaning brushes and thinning paints and I wondered how that worked. Then I found Venetian turpentine. http://www.dickblick.com/products/sennelier-venice-turpentine/ It is a resin made from larch trees with the consistency of honey, a gluey sticky substance that was added to paint to create enamel like effects. Many of the linseed oil varnish mentioned in the various manuscripts from the 9th through the 16th century have boiled linseed combined with different resins. There's copal and incense and other evergreen saps. The Venetian turpentine is not only similar/exactly one of the resins used, it is easily obtainable from art suppliers (and not $144 per 30 ml.) Sounds like a winner to me. I'm not sure if the liquid resin will be any different than the colophony I'm trying, but figured a few options and trials were a good thing.

So grinding and straining and mixing continues as I prep to smear my silk with oil-- an action that seems totally wrong to me. Here's hoping it goes well.

Tuesday, May 3, 2016

Back to IRCC stuff: Slippers

In the past I've made a variety of leather (and faux leather) slippers to go with my dresses. I did a parti-colored set in rust and blue to go with my Lucretia patchwork dress, the 'strawberry toes in red trimmed with green for the IRCC I dress, and the teal vinyl I for IRCC II. While the shapes aren't too bad, the materials are definitely not standard for Eleonora's wardrobe. According to Roberta Orsi Landini in (your favorite and mine,) Moda a Firenze 1540-1580: Lo stile di Eleonora di toledo e la sua influenza, Eleonora had few shoes and lots of slippers with the majority made up in velvet of various colors. Inventories hold thirty-two pairs of red, ten yellow, ten green, five brown, three pairs in grey, two in white, and one in black. Landini suggests the slippers normally matched the dress since there was a letter dated April 16, 1550 requesting white velvet slippers to wear with the white velvet dress Eleonora wore to Don Garcia's baptism but there were also ten green pairs of slippers and green was not a very common color in her wardrobe.

Eleonora's burial slippers don't survive. They, as well as the hairnet have disappeared since the original examination of the grave. There is, however, a lovely pair of surviving velvet slippers in the Rijkmuseum dated around 1550.  The shape is what I used to pattern the teal pair, so I should have a pattern around here. I just need to locate it. Although, with the state of my sewing room, drafting a new one might be easier. I have black, gold, brown, grey, and red cotton velvets but don't have white. while white might be the better choice to match the dress, even with a chopine or other overshoe, i can't imagine white staying clean for more than 10 seconds, so I am drifting towards a darker color. I have a charcoal grey as well as a silver grey and am leaning towards that, since it nods to the white but should stay a bit cleaner. On the other hand, the gold/yellow was more frequent in her wardrobe. Only one pair of black, but it is hard to argue that they would stay cleaner. I may test out stitching some buttonholes to see which one looks nicer in the treatment and see if that helps with decision making.
Via

Friday, April 29, 2016

Finished Elizabethan suit

 I need to get pictures rotated and there will hopefully be modeled pictures eventually, but I just wanted to make sure pictures of a complete object exist, since I'm terrible at remembering to do that. I also needed to make sure there was a blog today.

I did do one Eleonora dress activity. Mathew Gnagy (The Modern Maker) published his 16th Century Woolen Stocking Knitting Pattern today.  I have wanted to do the Eleonora stockings ever since IRCC I but I am not an expert knitter and the prospect of doing the 20+ stitches per inch has freaked me out. I've been practicing. I even got as far as swatching on 0000 needles. Swatching and panicking. I'm so unbearably slow at it. I knew I could do a plain pair of stockings with a modern heel in a lower gauge but have been hesitating. I bought the pattern and he included a much simplified version of the Eleonora stocking with a patterned band that looks similar to the top of the band on the burial socks, but not the wide cuff with eyelets. It does have the decorative stitches down the back. It also includes shaping for the bottom of the foot and heel more in line with extant stockings. It has enough of the feel of the stockings to make me happy, but I think they are much more achievable with my current knitting skills in the time allotted. I do need to get different yarn as my silk is much lighter than the sock yarn this is patterned for.

Known World Heraldry and Scribal Symposium is tomorrow, so I won't get really going again on the Eleonora project for another day, but I'm excited to get moving forward with it again.


Friday, April 22, 2016

Just so I have a list.

I realized I hadn't made an actual list of what I intend to do. Since I needed a blog for today, I decided this was as good of a time as any.

Toes up

Red "pope" shoes trimmed in black
Red silk stockings
Knitted garters
Drawers (not from evidence, but I'm more comfortable with them)
Linen camicia with lazy S blackwork
Red Velvet busti
stiffening for busti
hook and eyes for busti
petticoat skirt
fur lined sleeves
"enameled" buttons-- done
fitting dress mock up

flocked fabric for dress
linseed oil varnish tests
stencils
carve blocks
test stencil versus block
shaving flock
modern adhesive try
"cardboard"
Dress
eyelets
fingerloop braided lacings
doppia for train stiffening

woven diagonal ribbon in silver and gold

hairnet in tacked ribbon
hairnet in bobbin lace
partlet in better of the two

Cast pendant
short pearl necklace
long pearl necklace
earrings (look at extant hoops)
pearled tassel cascade
etched and enameled tassel head ruby substitute in bezel. Soldering
Set diamond, emerald and ruby substitute in cast quartafoil
braccone settings
large pearl in braccone setting
enameled links
rings to link-soldering


Rather a long list and not much of anything on the list is done. But, I'm progressing. I have the linen out for the camicia and am about to start on the blackwork. The flock is also coming along. I've got a gallon bag full so I can try out some varnish options. I'm swatching on the stockings to see if me knitting them at anything approaching gauge is possible, or if I will need to do a plainer pair in a larger knit. I'm also plugging along on the doublet and jerkin so I can cross those off the list and concentrate more of my time on this.

Tuesday, April 19, 2016

A rabbit hole full of adhesive

Via

I was going to start testing glue ideas since there didn't seem to be that many options of plausible historical glues. But first, first, I figured I'd have a look at the history of wallpaper and see if I could find a little more information on Jerome Lanyer's 1635 patent to manufacture. I thought maybe I could find some more direction for what types of glues could be. I found Wallpaper,its History, Production, and Possibilities by Henry G. Dowling with a couple more clues about the early history of wallpapers. I did find out that Jerome Lanyer received his parent from Charles I on May 1, 1635 for a process he called "Londraindiana," and paid 10 (the book didn't specify 10 what) a year to keep the lucrative right to make flocked hangings. I found out that these were not printed on paper because paper wasn't strong enough. I also found the flock referred to as wool dust. I also found a date of 1620 for a French maker of flocked hangings called La Francois of Rouen.

From there I got pointed to a 1758 book on painting, enameling, and other techniques with recipes for paints,varnishes, sizes, etc, by Robert Dossie titled Handmaid to the Arts. There's an appendix to the two volumes called "On the Manufacturing of Paper Hangings" that is pointed to as the major source on early papers, including info on flocking.  He discusses alternating large and small knives for chopping wool rags into flock as well as the use of a mill. He also talks about the application of the flock: "Flock requires to be put on with the varnish." He suggests printing the varnish then removing the hanging to another table "to be strewed over with flock that is later to be gently compressed by a board or some other flat body, to make the varnish take better hold of it."

In the earlier sections on the gilding of bookbinding papers and leather, Dossie also has some information that should transfer. He mentions that the size is put on a wooden plate or block rather than on with a brush. In addition to both gold size, he mentions that, "the size should be thickened with as much yellow ocher and red lead as the proper working of the print will admit." The size is applied to the block by setting it evenly onto a cushion that has been evenly brushed with size." This technique is an accurate discussion of the color sieve or color box technique that is used by modern block printers where a felt pad is saturated with color and then put on a stretched membrane that floats on some starch. This ensures even and consistent uptake of the color as you can't press too hard without the force being dispersed.

From Dossie I took a detour to The Grove Encyclopedia of Materials and Techniques in Art by Gerald W.R. Ward where I found the cool box for shaking the paper is a late 18th, early 19th century innovation and the earlier flocking would have been done with a longer staple fiber, and by hand. It also mentions the adhesive made from boiled linseed oil and letharge (that's lead oxide folks.) Back to Dossie, I find recipes for varnish and sizes. There's a glover's size which is boiled scraps of leather, making a gelatin glue that would be used warm too, but it doesn't quite fit the "varnish" definition.

So then I went off looking for suggestions on how to make boiled linseed oil without getting lead poisoning. I found Indra Kneepken's Master's Thesis for the university of Amsterdam. "Understanding historical recipes for the modification of linseed oil: An experimental study in the properties of modified linseed oil for use as binding medium in early Northern European panel painting". It is 150 pages of fascinating. That has sent me off digging through multiple Medieval manuscripts of recipes and back into Cennini as well.

I guess that's the long winded way of letting you know that I've gotten nothing done today but a bunch of reading? And my glue experiments are going to wait until I give this a few more reads and look up a few more references. I think the answer is here. Not as straightforward as "use rabbit glue" or "try some glair," but i'm actually very happy about that. i didn't think those solutions were going to work and this very well may. i like it much better than just grabbing a jar of modern glue off the shelf and doing that.


Further reading:
"Color and Other Materials of Historic Wallpaper" by Catherine Lynn, Journal of the American Institute of Conservation, 1981   http://www.cool.conservation-us.org/coolaic/jaic/articles/jaic20-02-003.html
 Handmaid to the Arts by Robert Dossie, 1758. This link does not include the appendix, but there is a great deal of information on varnish and sizes that I am finding helpful  https://archive.org/details/handmaidtoartsb00dossgoog

Monday, April 18, 2016

Plans for the rest of the jewelry

While I was squinting at closeups of Eleonora's jewelry, I ran across the motherlode of information and have to share it with you. Laura Marsolek, a bench jeweler and 2013 of Syracuse University with an interest in jewelry history just so happened to do her Honor's Capstone Project on the jewelry in Bronzino's double portrait. Even better, the paper (all 109 pages of info drenched goodness) is available free to the public.  Her third chapter is all about her own experience making a version of the belt section of the girdle (no drop or tassel,) the pendant and necklace, and a couple of dozen sleeve pins. The cherry on top? She has pictures of the recreation made using her modern knowledge and information gained from Cellini's treatise on goldwork. There are pictures in the thesis, but better ones on her commercial site. Please go drool.

While I wish I could just do my own version of her way, I unfortunately have no experience with the casting of bronze and don't know anyone locally who does. Nor do I have the ability to sink money into tools just now. So I will be making do with what I have. What I have is pewter casting equipment, purchased with prize money from IRCC II in fact, so it seems apropos to use them for this. I know several very talented pewterers to pester for advice, as well. I also have the tools and chemicals for acid etching brass, soldering stuff, and a whole lot of faux enamelling things.

So here's the current break down of my plans. First, the necklace. The pendant causes its own issues because it features a large laurel wreath. That makes it unlikely that I can wear it at any place I could wear the dress as it would be in an SCA context and I am not a Laurel and therefore can't wear the wreath.  This creates the problem of whether to do a different piece of jewelry or not. Conveniently, since there are 3 similar but different portraits, one comes with a solution. The Walter's portrait doesn't have the wreath. It is just the central quatrafoil setting with central diamond and pendant pearl. TrulyHats happens to carry a gold quatrafoil setting as part of the recent products Truly had made for her Katherine Parr reproduction. I thought I'd see if the large ouch would work. Or if it could be the base for some further embellishment. I plan to do the same thing with the quatrafoil settings that alternate in the girdle. Eleonora has diamonds and rubies as well as a single emerald cabachon. These alternate with 5 rosette links. The gems are in quatrafoils that are surrounded by cut branches called braccone. I think I can make the branch surround and solder them to the quatrafoils. The rosette links I'm going to cut out of sheet brass and acid etch, then enamel. The tassel head plan is also to cut it from brass, then hammer and solder it into the bell shape necessary and etch and enamel. As I'm a pearl freak, I already have far too many strands of 3mm freshwater pearls for the tassel.

There are 200 pearls in the necklaces (50 for the short one, 150 for the larger with further seed pearls between.) The number happens to correspond to the 200 Maria Salviati bought for her daughter-in-law . before the wedding. Those would have been some rather expensive saltwater pearls. As I don't have a Medici trying to bribe me to move to Tuscany, I'm settling for freshwater. It means mine won't be as large and beautifully matched. I do, however, have a box with like 100 strands of 9mm potato pearls, so the length isn't an issue. That will also be plenty left to pearl the partlet and hair net.

Tomorrow I'll be back to flock and glue. First up is the trial with egg as adhesive.

Sunday, April 17, 2016

Eleonora buttons


I totally lucked out here. Having these buttons already in stash was one of the major reasons I decided to go ahead with doing the dress. They are such a distinctive button with a large size, rosette shape, and the pointy bit in the center. I think having them helps to reinforce that this is a version of a particular dress or at least of a particular family. Interestingly, the same buttons can be seen holding the sleeves onto the dress of Maria de Medici, the daughter of Eleonora and Cosimo I in the portrait done of her by Bronzino in 1550.
Via

Whether that is because they were the actual buttons (or sleeve pins) used by Maria, or they were something from the artist's imagination is up for discussion. However, Cosimo I's inventory of 1566-72 has a listing for 193 gold rosettes enameled in grey, white, and black enamel that would have belonged to Eleonora. The number of them makes me think them the sort of thing that would have been used for "buttons." The portrait of Eleonora has 34 visible buttons on the left arm and another 8 on the right. We see all or some of three rows. The four panes of the sleeves mean there's another row of them not shown. All in all that means there's a lot of buttons.


There was a Kickstarter last year (August of 2015) by an SCA merchant who has experience having buttons made to order. it was one of the most painless projects I've ever done (and I'm sort of a Kickstarter junky.) The Kickstarter closed in August I had my buttons by October along with extra buttons, some aiglets and some lacing rings as a bonus.  I ended up with 125 buttons which should be enough to do the sleeves. Also luckily, as I am well known for not using things for projects even though they were bought for the project, I can buy more if I ever decide I need more since AvalonNatural on Etsy continues to sell them in both gold and silver.. YAY!

Il Giornale dell Arte

That's the good news. The eh news is that I really didn't like how shiny they were and how difficult it is to see the wonderful detailing on them. I just love the look of the quatrafoil heart and wanted to show it off.  So I decided that maybe I should patina them in some way. And then I got a really, really good look at the tassel on Eleonora's girdle. A company called Haltadefinizione scanned the painting in 2010 and had a live exhibit. Unfortunately, most of those pictures aren't accessible, but an art newspaper happened to publish this one. In it you can see the beautiful enameling on the head of the tassel. There are also bits of green and white enameling on the pendant of her necklace. I thought continuing the enamel through all the jewelry would be nice.


If I actually did enamel with the melting of glass, I would be foiled by the fact that you can't really enamel on just any metal because of the need to have a lower melting temp for the glass than your metal.  My buttons are a mystery alloy and I intend to etch brass for the tassel and possibly cast a pendant. with the mix of metals, I'd already researched options for the appearance of enamel that weren't glass. The best and easiest substitute available to my skill set: nail polish. The polymer enamel is easy to use, easy to obtain, cheap, and low stress. My local drug store had a bunch on sale for 49 cents in all kinds of colors and I have shopping/hoarding issues. I bought lots of colors so I'll be doing faux enamel for some time to come.


 I pulled out a finer paint brush and the reading glasses I use for embroidery and hit the low areas of my buttons with a bit of black nail polish. I also did the little "leaf" protrusions as well as the second of the three sections that make up the center point. I very much like the contrast. They pop against the silk and the design is much more visible. An hour or so of painting this morning got me 1/4 of the way finished. I should be done with the rest by the end of the day.


I feel like I'm getting off easy here and should be casting them myself. I figure I'll make up for it when I get to the girdle and pendant. Eleonora's jewelry was most likely made by Benvenuto Cellini (at least the buttons and girdle,) as he was the goldsmith that Cosimo I had on staff. Cellini wrote an autobiography as well as some treatise on goldwork and includes anecdotes about the Archduchess in his writings. I'll be talking more about his techniques as I approach the other jewelry. He was an amazingly talented artist as well as an entertaining character, so I'm enjoying reading both. Conveniently, his works are easily available in translation.


Saturday, April 16, 2016

Lazy S pattern for the camicia

Plate from Vavassore "Corona di Racammi" originally published in 1530
I love the 100 or so books published in the sixteenth and early seventeenth centuries jam packed full of embroidery patterns. After spending a couple of years collecting links and hard copies of them it is always exciting to have a project to use them for.  I considered just selecting a random pattern from one of the modelbuch published before 1545 to embroider on the cuffs and neckline of my camicia. I was seriously tempted by several from Engelnuff. (Yes, I do have a favorite modelbuchlein. Yes, I realize that says something about me.) After taking the excuse to browse through modelbuch for a few hours, however,  I went back to what was depicted the portrait. I was actually a bit disappointed by that. Here's a reason to utilize all this other data and I'm just squinting at the portrait?

The camicia has a simple scroll pattern of Ss on their side. There are quite a few lazy S and simple scroll patterns in the earlier books and I had originally pulled 5 or 6 to look at with various levels of simplicity, including a couple that added a flower or a heart and a few that omitted the acanthus style flourish. After looking at them a time or two I decided not to use them. This one from Vavassore is pretty much a dead ringer for the portrait and once I'd decided to do the S style, it only seemed right to do the exact pattern. But you have to admit, being able to find the exact pattern is at least sort of a good use of far too much research, right?


Closeup from Anea's site
The biggest reason for settling on the lazy S was balance. The pattern is actually rather plain and compared to the hundreds of other choices. It is just an s on its side with a tiny amount of flourish. I think with the overblown presence of the dress fabric, that's probably a necessity visually. If the embroidery was polychrome or more figural like several of the borders I was tempted to do are, it would get lost against the dress. The camicia is a contrast to the scrollwork and texture of the dress. It is simple. The sleeves aren't even gathered at the cuff. I was surprised to notice them coming out of the bottom of the sleeve floppy and a bit rumpled looking with no cuff or gathered frill.  I think the counter balance of the organized pattern and the informal finish helps sell the dress. it's also refreshing to see in all the uptightness of the mannerist portrait and I like that.

The best view I can get of the top edge of the camicia is from the Detroit Institute of Art portrait, There are two versions of the double portrait, one in Uffizi Gallery in Florence, one in Detroit. There is also a third portrait of just Eleonora in the dress painted posthumously. It is in the Wallace Collection in London. The Detroit portrait isn't quite as finely done as the Uffizi. If you are interested in finding out more about the differences between the two double portraits and seeing how the workshop of Bronzino was more involved in the Detroit version, there's an interesting article from the Journal of the American Institute of Conservation authored by Serena Urry comparing the two portraits and pointing out paint burs that show how the background was done and the faces left for the master. It also points out mistakes in the pattern of the dress fabric as well as looking at the simplification of the embroidery so it looks less three dimensional as compared to the Uffizi portrait. The Detroit loses the acanthus flourish and is a great deal more boxy. The extant published modelbuch, Furm-oder Modelbuchlein by Schonsperger published in 1523 has a pattern very similar. (Top one of the 3, although the bottom is a nice lazy S as well.

I like the Uffizi version via Vavassone a  bit more I think. What I don't like nearly as much is that either way, the cuffs and top edge are my least favorite blackwork type-- counted and reversible. I rather detest counted blackwork and have sworn off it. The cuff is turned up with a fully visible pattern showing in all 3 portraits, however. It is most definitely reversible. Sigh. I guess getting the correct look for things is why I embroider in the first place.


Friday, April 15, 2016

You put the lime in the coconut. . . Um, why is there wool in my blender?


Fear not intrepid adventurers, this blender, like the crock pot, toaster oven, and immersion blender before it has gone on to weirder things than it was originally designed for. As flocking was originally a byproduct of the manufacturing of wool cloth (I'm going to assume from when the cloths were fulled and shaved, but I haven't found specific mention) it isn't something I can lay my hands on. Well, that is not precisely true. Flocking fiber is easily obtainable from woodworking suppliers as craftsmen use it to line boxes (look, no fabric Ma!) and cover duck decoys. It is, however, made of rayon and nylon fibers rather than the historical wool. I have ordered some to try out so I can compare the durability and texture of whatever madness I manage to make and what the pros sell. You can get a kit with the flocking fibers, the color matched adhesive, and a mini-flocker that pumps air. Amazon carries them so I should be getting one on my doorstep soon.

http://www.bbc.co.uk/programmes/p01hb4d3
In the meantime, I wanted to try some ideas out. A few years ago I saw an episode of The Fabric of Britain focused on the history of wallpaper and there was this wonderful section on the 18th century fad of flocked wall paper as well as of its origins in 1634 when Jerome Lanyer received a patent for the manufacture of flocked paper in Engliand. Allyson McDermott walks Paul Martin through the historical process of making the stuff. There are supposed to be some clips at the link under the picture but the aren't currently working for me. It could be my geographical location so I included the link in case it works for others. I would really have loved to watch it again to refresh my memory. One thing that I do remember clearly, however is that Allyson has a giant box to shake the paper and fibers in.

That is important, because I have a feeling this is going to be a lot like glitter. It will never, ever go away. There's a traditional family Christmas story that was told by my mother as I was growing up of the first Christmas that she and my father had together in their little apartment. My mom decided to flock the tree. In the kitchen. She also decided to make paper Santas with bottoms made of folded magazines spray painted red. Another project she chose to take on in the kitchen. The red flocking was apparently a sight to behold and was still very decorative come spring. As it remained until they moved.

While it is lucky we own our own home and thus my genetic legacy of harebrained crafting ideas won't get me thrown out on the street, episodes like the time I poured candles and reconditioned our countertops with beeswax in the process have made my husband wary. So I guess I'm getting a box with a good lid before I do anything of any size. First experiments will therefore be little samples.

Deep breath. Here goes. I started by taking a wool remnant I had hanging around and cut it into little bits with scissors.

That gave me a start. Obviously no consistency and it's not nearly fine enough.
 I threw it in my Ninja and pulsed it for about 4 minutes. I knew that wasn't going to be nearly long enough, but I could see some of the smallest bits being fine enough and I have a limited amount of time while my twins are at Kindergarten, so there's a deadline I'm fighting.
 I put a stencil down and brushed glue onto a cream silk taffeta. As I said, not fine enough, and not enough of the fibers that are, but I'm seriously encouraged. I'm using a generic craft that dries clear since that's what I had and I'm testing the wool first. I will need a heavier bodied, slower driving glue and I want to try tinting it to deepen the color of the finished design. Excitingly though, I think this might actually work. I'm going to chop more wool today.

Thursday, April 14, 2016

$48,000 of fabric


Posthumous portrait of Eleonora in the Walters Collection Inscription: 'FALLIX.GRATIA.ET.VANA.EST.P / VLCHRITVDO' ('Favour is deceitful and beauty vain'; Proverbs XXXI, 30
 If you happen to have 45 minutes and any interest in Renaissance Italy or clothes, you should have a look at this video of a talk given at the Met by Dr. Sheila Barker.  Prunes, Pearls and Malara: Behind the Scenes of Bronzino's Double Portrait of Eleonora di Toledo and Giovanni de' Medici.

I've watched it obsessively over the last couple of years more than once. From it we learn that THE dress took more than 3 years to design and make. We are also told that the fabric cost 390 gold scudi for 46 bracha (about 27 meters.) A gold scudi has about 3.5 oz of gold in it. Just for kicks, you should know that the price of gold today is $1,228.30. It is difficult to translate money directly, especially as the cost of living then was about 20 times higher for luxury items like clothing and things we find easy to manufacture and purchase were more difficult while other items were vastly cheaper, but a ballpark is about $48,000 (Dr. Barkers number) for the fabric in coin value (not the value of the gold.) Eleonora chose this fabric from a selection of samples in July of 1540. She kept 10 bracha for her own dress and used the rest as gifts. For those keeping track, 1 bracchio equals 2 palmi. Or, for a bit more ease, a Florentine bracchio is .583 of a meter. A Venetian bracchio was .683-- just to make things more confusing.  That means a bracchio is about .638 of a yard. So, Eleonora's dress was made with about 6 1/3 yards of fabric.  So hey, she actually used less than 1/4 of the total fabric. Perhaps the fabric cost was probably closer to $12,000. Especially since her father sent her over 200 scudi two years after she sent some of the fabric to her sister as sort of a payment for gifts given.

I tend to buy 10 yards a dress, so I'm feeling rather profligate regarding my fabric use. Granted, Eleonora was closer to 5'3" and I'm 6'1." But, as I've learned in looking more closely at Algega and other tailor's books, my layouts aren't as tight as they should be and I make my skirts too full. I hope to remedy some of that with this project, but I do love a twirly skirt.

On the other hand, while I will not be spending $12,000 on my fabric, I will be spending a crap ton of time making it, so keeping the yardage to a minimum is probably a solid plan and I'll be doing some mockups of the dress. Part of that is also a sizing worry I've got. I had surgery last summer for weight loss and am down about 160 lbs. I've been stalled for a couple of months, but my size and shape are still in flux and I don't have a good tried and true pattern for me at this size. So I may figure out printing the fabric and let it rest a bit to wait until I can be sure it'll fit come August.

But, back to the fabric. I threw a few ideas out yesterday about possibly gilding or flocking. I'm also considering if whether a combination of techniques with some couching of gold threads might be in order. I'm not sure yet what is going to happen. Some testing is going to have to happen. In the meantime, lets talk about what techniques can be documented for block printers.

As we saw yesterday, regular block printing is definitely being used in Italy. When I did my first experiments with block printing clear back during IRCC II with what became my drawers and a soccacia I mentioned our good friend Cennino Cennini and the ever present Craftsman's Handbook. He discusses methods for block prints and painting fabric. Extant examples exist for the 16th century, like the LACMA piece I posted. Additionally, there become finer examples of printing on fabric with engraved plates via printing press. The other two examples I posted yesterday were done this way. I've been messing around with acid etching for the last couple of weeks and I may try out printing with a plate if I can get a way to get the pressure right. The other thing I want to try is flocked printing.

http://collections.vam.ac.uk/item/O257815/furnishing-fabric-unknown/
There are written references to this being used to create ecclesiastical textiles in Italy. I don't happen to have located any extant fabrics yet, but here is an example of a Danish fabric done in imitation of an Italian Velvet with wool flocking. It's held at the Danish National Museum. Go read Mathilde Girl Genius snippets about it and look at the pictures. There's also this fabulous French piece done with mica sprinkled over block printed glue in the V and A. It just so happens to be a dead ringer for an Italian cisele velvet used as an altar frontal. You can take a peek about half way down the page of extant fabrics Bella has posted.

I've got some hide glue on the way as well as carving materials to make large blocks so I can start testing out printing options. In the mean time I'll be drawing up sketches, squinting at the portrait, flipping through the entirely too many modelbuchs I have and trying figure out what embroidery design I'm doing for the camicia.

Wednesday, April 13, 2016

Goals are just dreams with deadlines, right?

I've got plenty of dreams, and not many goals, so looking for a deadline I signed up for the Italian Renaissance Costuming Challenge this year. I was originally going to go with another inspiration pieces, but my friend Fia is hosting a black and gold challenge (Artemisia's kingdom colors) with a deadline in October, so I decided to pick something that would work for both.

The fabric is, of course, the one major issue in what is otherwise a beautiful, but reasonably straightforward, gown. The fabric is arresting and take your breath away. It is symbolic and iconic. Since this is one of the dresses that most Italian costumers take a run at at some point, I had already been keeping my eye out for what the fabric options were. There's the version from BonniePhantasm on Spoonflower that several costumers have been reasonably happy with. It is one of my backup plans but I wasn't real enamoured with it. I'm a tactile person and the best color and draping version of the fabric also happens to be the 100% polyester version. The other major option used by other seamstresses was the Sartor version that was woven in silk. They sold out almost instantly, and if I wanted it, I'd just have to order 50 meters to have them do another run. I feel doofy for not buying it when everyone else did, but at the time I wasn't as interested in the dress. Since, well, everyone does this dress. In hindsite, I sort of smack myself in the forehead, but it is what it is. Back to the present. I not only can't afford to have 50 meters printed, I don't love the silk enough to do it. There's no texture to it and they went with a really light gold and a beige background so it seems sort of washed out. It doesn't grab me like the painting. I'm also worried what it would do to my coloring and just how ghostlike and weird I'd look in it.


After the exact pattern versions were crossed off I got into the sorta kinda close territory. (I know-- I was doing the but, but NOOOOOOO lower lip quiver too. But this was over the course of a couple of years so I had time to adjust.) I started scoping out damasks and brocades and velvets and any other search term I could think of. I'm a fabric hoarder. I mean shopper, Yes, shopper, that's it. So I look at fabric sites on a consistent basis. I had the Eleonora gown in the back of my mind and kept an eye out for something that might work.  Robert Allen has a cut velvet that has the same sort of feel to it called Jeu De Balle. It is a 75% rayon 25% polyester with a nice drape. I have samples and it doesn't feel at all plasticy. I have sewn with several Robert Allen home dec fabrics and always been happy with them. I wasn't as happy with the $160+ a yard msrp, but I did find a remnant of about 4.5 yards for under $100. If I could possibly have gotten the trained dress out of that much fabric, I would have gone that direction.

I was reading Joe Thomas' article "Fabric and Dress in Bronzino's Portrait of Eleonor of Toledo and Her Son Giovanni," and he refers to a type of fabric Florence was known for called ferroneire because of its resemblance to ironwork. There were several other strapwork fabrics I considered because of that. Speaking of the article, that was one of the few things I took from it. Thomas fixates on the early 19th century assertion that Eleonora's burial dress is the same one from the painting and thus takes the statement that the burial dress is a satin with galloon trim in concert with the statement that it is the Bronzino dress and asserts that the fabric must be a satin with with floating wefts. Since the burial dress, as examined in excruciating detail by Janet Arnold with the conservation documented in a couple of hundred photographs on the Medici Archive for public view, is blatantly not a woven pattern, has embroidered bands of decoration, and was probably originally a green silk, the paper has some major flaws. (I'll come back to all those nifty photographs when I talk about patterning this thing. There's a picture of Janet wearing the muslin toile she made of the dress that makes me smile a lot.)

So, back to trying to decide if I should sell one of my children to finance large fabric purchases, discarding using a fabric that was close and picking something else, or just picking a different dress to do. I have bunches of other fabrics I could pull from stash. If I want to still do the black and gold themed thing I've got several bolt black cotton velvet. Or there's the 60 yards of black and gold ecclesiastical brocade I got in a killer deal. Then inspiration hit.
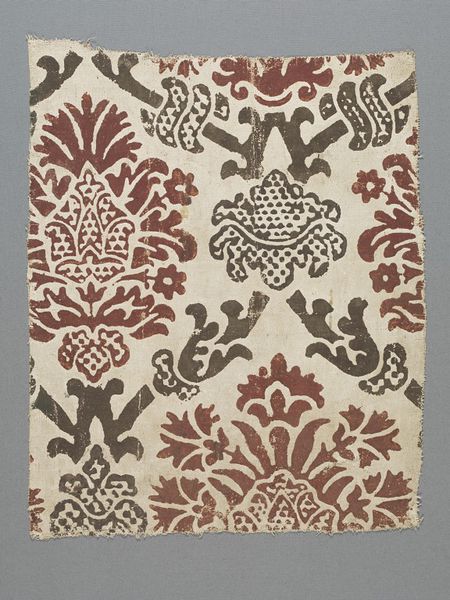
Object 09.50.1096 from The Met

I block print fabrics for fun.

There are several examples of Italian and Spanish block printed fabrics from the 16th Century. Like this one at the Met. And this one. This one in LACMA isn't as detailed, but it is also 16th century and Florentine.

I can make my own fabric! And it won't take forever and ever. I have a machine embroidery machine and the files to embroider the motifs are available from Etsy from Liuba at ArtEmbroideryDesign, so I considered that for a few minutes. Only a couple of minutes. Then I decided that would probably take all 4 months of the challenge since I have a smaller machine and it would make me crazy. And I couldn't even get an A&S project out of it. Not that block printing it will be super simple. There will be a reasonable challenge to get the registration correct for both placement and to accomplish the two clear colors and I've never carved blocks as large as the ones I'll need, but IRCC is all about challenge, right?

Now I have to decide if I want to gild the gold for my fabric. Or maybe try to do some flocking. There are examples of dimensional fabrics made by stamping with glue and then sprinkling it with wool fibers from the manufacturing of wool cloths. There are also some furnishing fabrics that used mica for color and sparkle. I'll post some of those examples in tomorrow's post (I'm going to try my traditional IRCC plan of posting daily and so am saving myself something to talk about.) Let the dreaming begin!