And yes, it is not a particularly attractive piece of clothing. That's alright though. It was never intended to be worn alone. Not even at home. There were to always be a couple of additional layers worn with it for casual wear and lots and lots more for doing things like leaving the house. The decoration at the forehead might peek out from under them, hence its focus, but mostly it was just supposed to be a tight little cap to keep the dangerous hair of a Russian woman contained.
I used a few more of the little flowers and I'm really pleased with the mirrors and beads and gold. I'm laying a solid foundation of bling to build upon. I think there are enough of the flowers with the bugle bead flourishes to embellish the rectangular flap that attaches to the back of this. Then I plan to use some of the plain flowers and perhaps some of the larger pieces to embellish the ubrus (sort of a heavy veil-- the word means towel.)
The new Italian/Lotto gown is going pretty well. I sewed most of the boning channels for the bodice late last night and plan to finish the rest up tonight after my kids are asleep and I can get downstairs to the sewing machines. I still haven't gotten around to making a corset yet, so this will have interior boning like the Camilla dress. If I didn't have my shape I could probably get away without it, since there are definite wrinkles at the waist of the painting, but I need shaping and support. I'm going to "bone" with hemp cording, however, in order to give it a softer shape. I plan to add a layer or so of wool felt to smooth the bones out and as a substitute for the fur lining that I'm forgoing. The bodice will have 6 layers like the last one since it seemed to work pretty well. I added a little extra allowance to allow for the cording. Right now the bodice is too large. Hopefully threading the cording in will solve that problem. Guess we'll see how that goes some time tonight.
Showing posts with label povoinik. Show all posts
Tuesday, September 6, 2011
Monday, August 29, 2011
Making a povoinik
I thought I'd share how I assembled my little coif/povoinik since I haven't been really able to find much information. Lisa Kies/ Mistress Sofya la Rus (as always) is the go to source for Russian re-enactors in English. Her website is FABULOUS. She has 3 "patterns" for povoinik, but I thought it might be helpful to go step by step. This is the 3rd pattern. I'm using it because it seems a bit more accurate to me. Not that that is necessarily true, because we have no extant pieces to compare it to, but it is much more like the povoinik that is worn with traditional costume. It also has a lot in common with Elizabethan coifs. In addition to Sofya's site, I'm using the instructions from a site on traditional dress. It's in Russian and I'm working with directions via Google translate, so its a bit interesting, but I did like the cuts used. I also like the lining and additional decorative back piece, even if I didn't do mine that way.
So, here we go. I'm doing my 
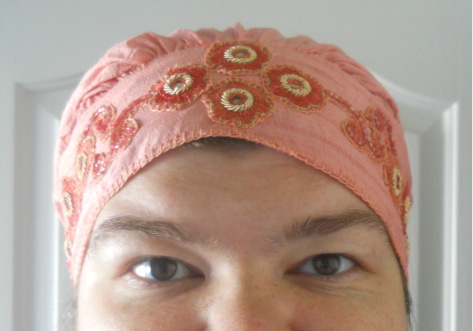
povoinik in a soft peach silk. In part that is so that it will match the appliques (since this is the dupatta for the outfit I scavenged them from) but mostly its because I have a shortage of white linen in the right weight right now. Linens and brocades would all be nice for this project. I probably actually want more body to the fabric than I will end up with, but I do plan to add a removable lining later so that I can wash the lining without having to wash the whole hat and that should take care of some of the issue.
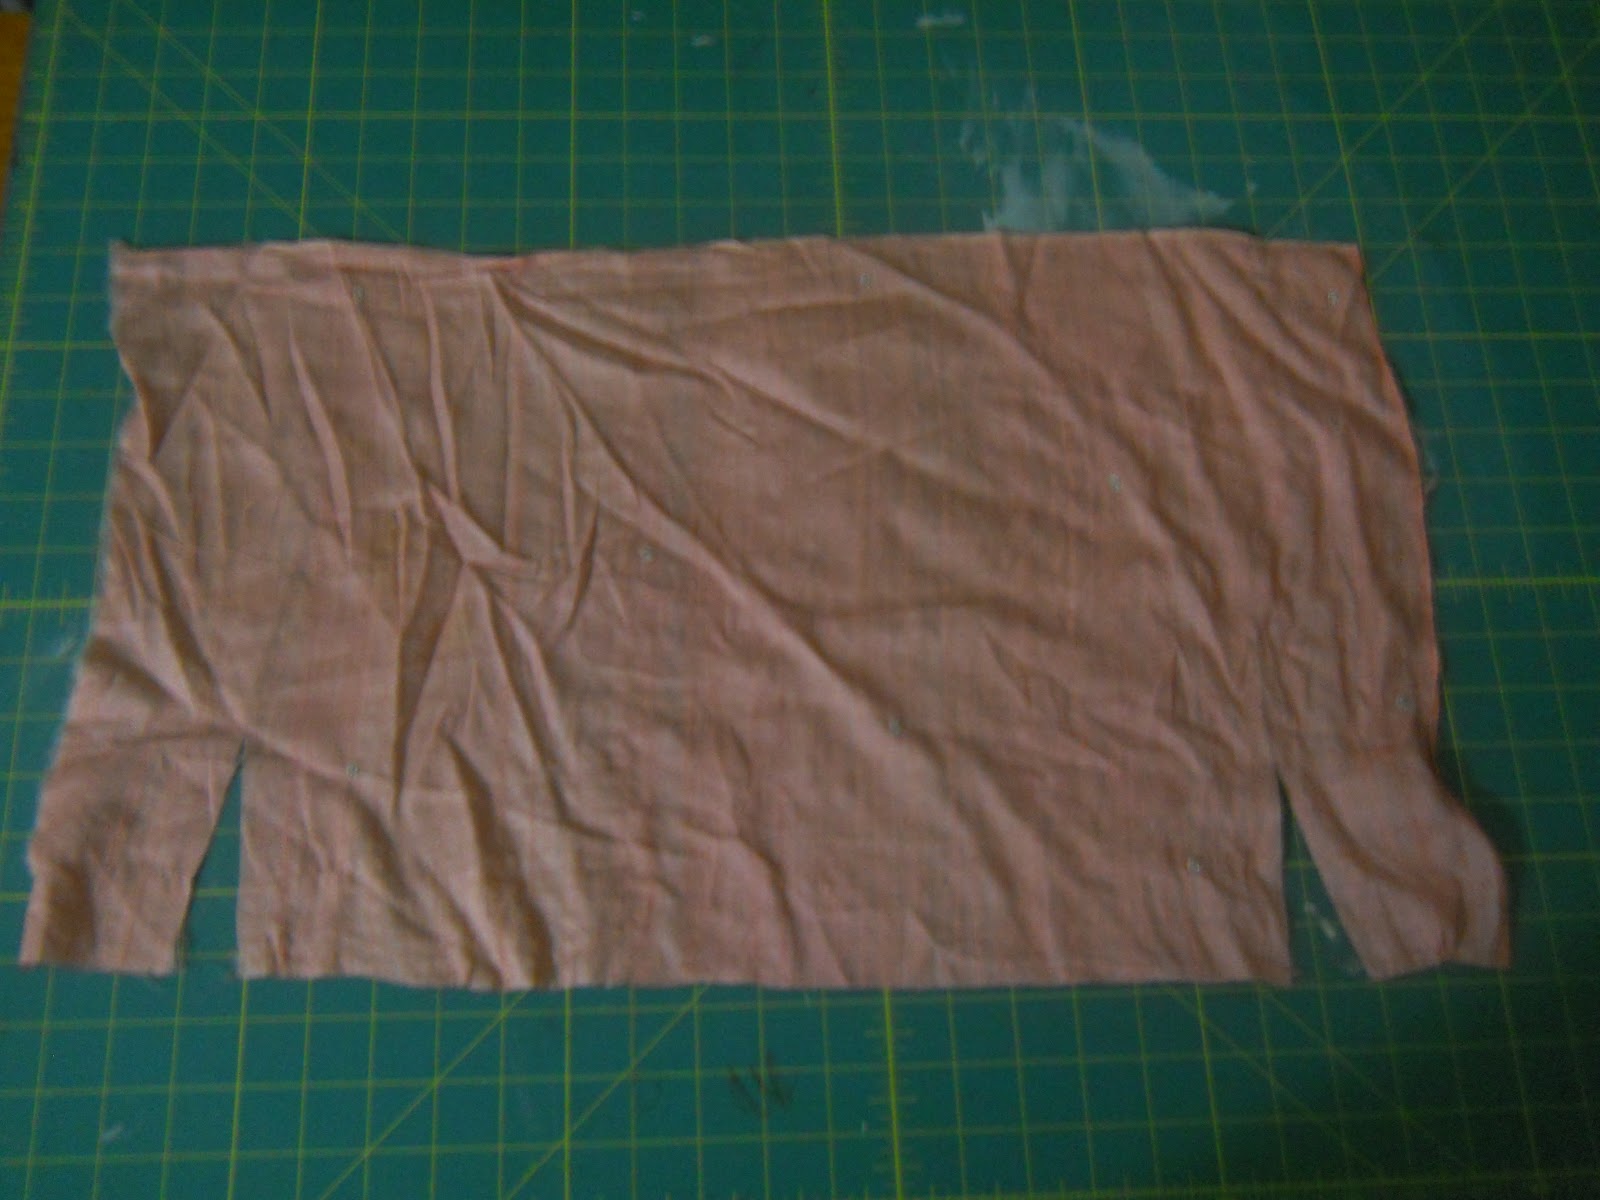
Step 1: Cut a rectangle. The Russian instructions suggest about 10x13" and Sofya says to do the height the length from ear to ear over your head (plus seam allowances) and the width the length from your forehead to your nape. I cut mine pretty large since I have a melon for a head. (mine's about 14x20) Cut two slits on the front edge about 3 inches in about 4 inches deep. As a side note, don't iron your fabric and then sit on it crumbling it up into a pile of wrinkles.
Step 2: Gather the center section. You actually want to gather the whole thing, turning the corners and gathering all 3 sides.
Step 3: Sew the two short ends of your outside pieces together. This seam is now the center of the front of the povoinik.
Step 4: sew your gathered edge to the front band of the coif distributing the gathers evenly. Now would also be a good time to do a rolled hem on the short sides of the rectangle.
Step 5: Take the other long end of your rectangle, turn it under and sew a casing/hem.
Step 6: thread a drawstring through your casing.
Now the fun part comes. Decoration! You'll notice in the Russian article that there is a wide piece of trim put over the forehead piece which covers the seam. That makes it really convenient to make your povoinik and then add a slip of embroidery so that you're not trying to do the decoration on two separate pieces that are then seamed together. I'm planning to embroider the forehead, and then attach a facing to finish the front edge and cover the gathering on the inside. How you finish the front edge is going to depend on how you chose to decorate the forehead. I made one where I wanted a narrow front band and just folded it in half and stitched it down inside making it into a facing.
I'll get going on the embroidery/applique and babble about more finishing options as I show you my progress.
BTW, this isn't nearly as puffy on my head as on the mannequin. As I said, I have a large noggin, and the poor dear has no hair to need the extra volume created by the gathers, where I do when I get my double braids wrapped around my head.
Saturday, August 27, 2011
Just lacks a ribbon and we have a volosnik
I thought I had a ways more to go with the netting, but ran out of the pearl cotton I was using (left over from another project) and decided to check and see how much I needed to purchase. I put in a temporary drawstring of the first piece of cording that came to hand thinking I had quite a ways to go. I tried it on and its plenty roomy enough to cover my braids and the povoinik that would be worn underneath. Hooray for being done with it much more quickly than I'd hoped.
Since this is a first attempt , won't really be seen much in the finished outfit, and I'm trying to use as much stash as I can for certain elements so I can splurge on others; I didn't use gold, silver, or silk threads, which would have been more appropriate. I opted instead for a light cotton perle. I did a series of Solomon's Knots rather than netting. Both use a gauge to loop and knots to stabilize, but I'm much more comfortable with a crochet hook than a netting shuttle. I used the out of period technique in the interest of time, so I'm not still making this next summer. As I said, just a little bit of finish work left. I'm planning to starch the mesh a little so that it gives a more proper shape. I think I will just sew some more of the green into a tube and use it for the ribbon to continue with my salvaged materials theme here.
I've been watching Star Trek:TNG while I sew so I have decided to make the povoinik and pozatylnik next. I better explain that last sentence, hadn't I. A pozatylnik is a rectangle of fabric that lies over the back of the neck, covering it from exposure. It always reminds me of the headwrap/drape the Ferengi wear. The povoinik is the basic coif that starts the whole edifice that is a Russian woman's hat. It's a pretty simple coif with a drawstring at the back to draw it tight over the double braids, but they usually has a decorated forehead just like the volosnik. The pozatylnik is attached over the povoinik to cover the neck. The volosnik is worn over it. Its sort of analogous to a chemise and drawers and petticoat for the head. As I said, we're building a proper foundation for what goes over the top. Just need to decide if I'm going to use something different for the forehead of the povoinik or continue on with the applique.
Subscribe to:
Posts (Atom)