Monday, December 23, 2013

Dominico's Award of Arms belt

One of my friends was getting his Award of Arms. An award of arms is the first level of award in the SCa. It is what lets you stop being called m'Lord or m'Lady and become a Lord or Lady with the right to bear heraldic arms. Your device become a Coat of Arms. In Artemisia, unlike many other SCA kingdoms, we don't wear circlets. Instead, we receive an "A". If you take a look at His Majesties neck in the picture, you can see a chain of estate made of A's. Each bearer of arms in Artemisia holds an A of the same type as in the Kingdom Chains of Estate. A custom that has also cropped up is the receiving of a belt to hold a knife that you are now allowed to carry in the royal presence. (Yes, the SCA is an odd place with unusual customs. But we're having fun :) )

Often the belt is rather generic and pulled from the stock of the kingdom. Mine was purchased by my Province and was a plain leather belt blank. Other times if someone is given enough notice they will make of purchase something a little more individual. I previously made a pleatwork apron for a cooking friend who was getting her AoA. Dominico is the husband of my friend Maysun. They tend to dress in two extremes brought on by the exciting place that is Venice. Maysun's persona is Persian. Dominico is Italian. Since he has two different styles of dress that are worn about equally, our household decided he needed two belts. I was tasked with making the Persian one.

Dominico is a pretty plain person, so I tried not to get carried  away since I wanted him to like wearing his belt. The belt is brown linen brocade backed and self bound with brown silk. I wanted to put on tassels, because everything is better with tassels. but they weren't appropriate for Persian style. I did add some jewelry findings to vaguely represent belt plaques, and a few pearls.

I wasn't able to attend the event where this was presented, but I heard that it was well received.
Speaking of SCA awards, I recently received my White Lark from the Barony of Loch Salaan and induction into their Labouring Artists Recognition Company. I felt very honored, especially as I am not part of the barony, so this is my first baronial award. Baroness Jennet displayed the fan I made her last year while explaining why I was receiving the award. She's carried it rather prominently since I finished it. Getting to know your work is appreciated by seeing it cherished by the recipients is worth all the time put into it. And getting a shiny is rather fun too.

Friday, December 20, 2013

And now for some overwhelming cuteness

This is Fia's little boy pushing cuteness into overdrive. Honestly, I don't think anyone cares one iota what he's wearing what with the 1,000 watt smile. He does, however, show just how awesome wearing trunkhose can be. I don't have any pictures (yet, I hope yet) of him in the full outfit, but with hose, a shirt, and hat he cut quite the dashing figure at Solstice Court. His mama was more than a little worried she'd be outshone.

Scraps from his mom's dress serve as the lining, underlayer for the trunk hose and part of the trim. I had a random piece of brow/gold fabric that matched the contrast on Fia's dress and makes his jerkin and the panes for the trunkhose. The trim is just more of the metallic yarn trim I made couched down.


I just made up the pattern on the fly, laying down one of my son's shirts and cutting a vest following the shape.  I added some shoulder wings, a collar, and some skirts and called it good. Sewing for little people with no actual shape has some advantages when it comes to reckless disregard for fitting. I had planned  to put on some  little heart clasps to hold the jerkin closed, but turned that over to Fia. She got them in place for Solstice and I think it carries the heart motif over nicely into his suit.
The trunkhose are a base of canvas cut into a basic pant pattern. I only cut them knee length and then did an overlay of the blue satin. rather than do a two part hose with attached canion, I simulated the effect by putting on a band of the brown fabric to cover the bottom of the panes. There is an elastic waistband for quick diaper changes.
The hat was done using Missa's floppy brimmed pleated hat tutorial. It has a felt inner and more of the blue satin as the outer. I embellished with bronze and black ostrich feathers and a random feather pick I got on clearance. Because every little boy needs a jaunty cap.


Thursday, December 19, 2013

Cutwork and pearls part 1

I am a bully. A costuming bully. I have been known to force sewing on friends on more than one occasion. My friend Fiametta was in need of some new clothes for Solstice Court but was in the middle of making a wool coat for His Majesty as well as being in the middle of life. I told her I'd make her something. She said she had to sew for her kids and niece. I volleyed back that I'd sew for them too. She returned with the fact that there was only two weeks until the event. I rather forcefully rejoined "just tell me what you want." She dithered. I muscled my way into her house and grabbed the fabric and then proceeded to make what I felt like she should wear. Sometimes being my friend comes with a bit of peril.

She had been thinking about doing the Bella Nani with this fabric. It is a gorgeous, gorgeous painting, but she didn't have fabric for the sheer overlay or ideas on building the large jewelry pieces. She had some lion heads that she wanted to use, but we needed to layer them with something and I was fresh out of ideas. Without the outer layer, that dress really loses something. I wanted to do something a bit more blatantly ostentatious. I had fallen in love with Carol Salhoum's IRCC I dress and the inspiration portrait of Clarice Ridolfi Altoviti
by Christofan dell'Altissimo. The cutwork on the bodice is just scrumptious. And there are beads. It is much more decorative than your standard Italian dress. Since Fiametta is anything but understated, I felt like it was a perfect match.

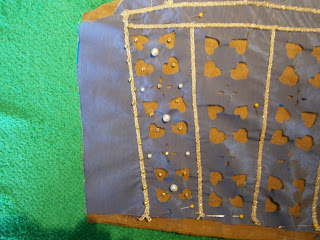
The fabric I was working with had gorgeous drape and incredible color, but was not a natural fabric and wanted to fray, so I felt no compunctions whatsoever in just deciding to interface the entirety of the pieces. Even with the interfacing, the cut edges still have that lovely fuzzy halo that cutwork can bring. Rather than doing the petal cuts of Clarice's gown, I decided to do hearts. Fiametta's emblem is a flaming heart and I wanted to use a lot of heraldic ideas in this gown. I made up a small stencil of the graduating panels and used that to draw out the entire pattern piece on brown paper.
I used an exacto knife to cut out the pattern and then laid on the reverse of the bodice. I just traced the openings in the pattern with a regular pencil directly onto the interfacing. Then it was just a matter of cutting, and cutting, and cutting out hearts. The pattern is pretty much identical on both front and back of the bodice. The picture at the head of the post is of the back.

I knew this project was going to use a whole lot of trim. As we all know, trim can eat up a budget like nothing else and often costs several times what the fabric cost. This wasn't one of those circumstances where that was going to be okay, so I took a day off sewing and made trim. Once again, this is one of those moments where I use non-historically accurate methods and my tool of choice, a crochet hook. I didn't have the time to do lucet cord because I needed close to 100 yards to do this dress and the outfits for her kids, so I chose to do a crochet version of the square braid. Ingunn Santini has a free tutorial. Or there are several youtube videos of 2 loop i-cord for crochet that all work out to be about the same stuff. It isn't actually crocheting since it doesn't involve crochet stitches, but using the hook to work with your loops makes for a fast trim. I managed to make about 50 yards in the time I had allocated and then ended up using plain interlooped chain to fill in the trim gaps. I used Kuka Bright in Gold by Ice Yarns. It doesn't look like it is available any more, but I laid in a large supply. It's a light metallic yarn about the thickness of a size 10 bedspread weight crochet thread.

I treated the cutwork layer and an underlayer of a bronzy gold as a single layer. The beads and trim are attached to both and keep them together. I've got a large pearl in the center of each square heart motif, a smaller pearl in the center of the diamond cut, and two smaller pearls flanking that. I've also got gold rocaille beads tacking the gold trim down to the underlayer. The small pearls in the center of each heart are only on the underlayer, but I liked the look. Yup, I took the nice beaded look of the portrait and went more than a little over the top.

I knew this dress was going to be a bit fantasy with some weirdnesses (as heralds are wont to call steps from period practice.) I didn't want to blow right through the line, but it certainly isn't comfortably accurate.Ah well, it is fun. And beautiful. And full of sparkle.

I still need to babble on about sleeves and construction, so we'll get around to those in a different post.

Tuesday, December 17, 2013

"Stained glass" at Toys For Tots

Even though I was the feast steward for my Province's annual Toys For Tots event this year, I had my fingers in a few other parts of the event. Several of us tend to hang out at the IHOP after fighter practice and some good ideas get mixed into the weird ones that pop up at 1 AM when all carbed up on pancakes. I'd been reading some of the earliest printed examples of fairy tales (because they are Italian and smack dab in the middle of my persona) and thought it would make a great theme for a kid centered event. We use one of the local Senior Centers pretty regularly for our events and I'd been trying to come up with ways to add to the decor. When I wrote up the bid for the event, I casually included that there would be stained glass windows as part of the decor with fairy tale themes.


Yeah, I always get myself into the best messes. But this one did at least have a giant tote of stained glass paints I got on super duper clearance behind the impulse. Thing is, they are formulated for use on glass. And I certainly didn't have the time to go in and put stained glass paint on the Senior Center's windows. I don't think they would have appreciated that particularly much either.  So I tried a few alternatives and settled on a thin clear vinyl to paint on.

The next issue is the fact that I've never painted any stained glass and I'm not much of an artist. I had grand plans of doing full panels involving the various fairy tales, but became disabused of that idea pretty quickly. I scaled back and decided to try doing one design that I'd use as a frame for all the windows. I then left a center medallion to put the stories in. Since stained glass was often painted, I took markers and drew the tales. Not remotely accurate, but nothing about this project is. There is also the great thing that the marker on vinyl is removable with some alcohol and we can use the painted frames for other themes by wiping off the marker.

So here's Jack and the beanstalk, Cinderella, Rapunzel, and Sleeping Beauty. I tried to introduce a swirling element into each panel to tie random items from the story together. Cinderella's pumpkin vine curls around the mouse and the shoe.
 The briars of Sleeping Beauty pull together the spindle, the bed  and the prince's sword.
Jack's beanstalk holds the singing harp and the goose who lays golden egg's nest. Jack's old cow is a bit more chipper than usual since the autocrat's device is a dancing cow and I put it in to make her laugh.

Rapunzel's hair tumbles from her tower and covers her comb, brush and a rampion or two.

I had some help from my friend's KyneWynn, Marguerite, and Eidou with the leading and then I spent a few evenings painting.
We attached the vinyl to the doors of the building with some electrical tape and called it good, but I'm hoping to improve on the idea for next time. I hope they were well received, but I was in the kitchen, so what went on at the rest of the event wasn't something I was much in touch with. Tabitha was kind enough to take pictures of the windows for me and well as keep an eye on my kids so they could enjoy the day. I can't express how grateful I am for that. I feel like it was at least a step in the right direction in decorating the site.
Regardless of anything else, however, as the expression on my little boys face says-- it was a fun event.

Monday, December 16, 2013

Lots done-- none of it posted

I got rather swamped with the feast I was preparing in November and then with crazy Solstice sewing and just kept working and never got around to pictures and posting. Since I've got some more big projects coming up in January with The Realm of Venus' Fabulously Fashionable Fur mini-challenge and The Harpy's Needle and Thread Grudge Match going from January-March, I figured I'd better start playing catch-up.

I don't have all that many pictures, so what gets described is contingent on what pictures I get. First up is a gown I made for my daughter's best fried/my best friend's niece. She's 11 and looking so grown up in her first sottana.Her aunt told me she needed a dress the week before and I had several other outfits going at the same time, so this was an afternoon project and I took all the shortcuts I could.

I love doing Italian for little girls. Doing side back lacing is basically like making a modern jumper. Because I used a heavy weight upholstery fabric, I didn't add support layers to the bodice, it is just the upholstery and a broadcloth lining with lacing rings. The baragoni are scrap from my cappotto with a simple interlooped trim. I cut tabs and stacked them and then whipstitched them to the shoulder. I used the same blue for her skirt guard.  Her girdle is just beads strung on a length of beading wire (tigertail) with an extra large lobster clasp so it can adjust as she grows older and changes shape.  She loves horses, so I found a set of carved stone ones and stung them on wire for her.

I got asked about the reta a couple of times. As I said earlier. I was taking shortcuts all over the place with this one. An accurate reta would have been netted. My netting skills are minimal and very labored. I have, however, been crocheting since I was 5, so that is fast for me. Totally inaccurate since crocheting didn't come around until the Victorian age, but fast and pretty. 

I did, however, want it to be a step above the cheap snoods from overseas, so I took care to make this shaped more like an Italian one and there is no elastic involved. It hugs closer to the head than the mass market snoods and has a thick fitted band that I jeweled and pearled and that is pinned in place.

If anyone else needs a fast (totally innacurate) project, here's my crocheted Italian reta recipe. (I am terrible at patterns and this is probably totally incomprehensible, but basically you are increasing 9 each round, and then decreasing on your final 2 rounds followed by a dense single crochet band of 5 rows.)  You can also make something more decorative by using the center from your favorite doily pattern and then decreasing the final rows and adding the band.  You will want to use a hook that is at least 3 sizes too big for your yarn so you get a very loose chain/stitch. I used about a size 10 bedspread crochet thread and a size G hook.

Round 1: chain 3. slipstitch together. sc 9 times in ring.
Round 2: hdc twice in each sc around
Round 3: chain 4. hdc in first stitch. *Chain 2, skip next stitch, hdc in next stitch. repeat from * around.
Round 4: chain 5. hdc in first stitch. *chain 3, work hdc into chain 2 space of previous row, repeat from * around.
Round 5: chain 4. hdc in first stitch. chain 1,* hdc in chain 3 space of previous row. chain 1. hdc in same chain 3 space, chain 1. repeat from * around
.Round 6: chain 4. * hdc in first chain 1 space, chain one, skip next stitch, hdc in chain one space. repeat around
Repeat rounds 3-6.

Round 10. chain 3. hdc in frst chain 1 space, skip next chain 1 space. hdc in next chain 1 space. repeat around.
Round 11. Chain 3. hdc in first stitch. skip next stitch, hdc in next stitch. repeat around.
Round 12. sc in each stitch around
Round 13-16. sc in each stitch around. Finish off

As I said, I am terrible at patterns and I did this on the fly, but if you want to give it a go, I'm happy to help  you figure out what was going on in my brain.