Wednesday, May 30, 2012

Strano and Franco


Via
 I've been busy trying to clean my house after a week or so of neglect. That and four kids don't really mix; unless your goal is a giant mess. Therefore, no crafting happened today. I spent my down time reading. I'm catching up on Italian culture since I've been more immersed in medieval Russia up to this point. I'm drifting more and more towards a change to an Italian (or possibly expatriot Greek) persona though so want to ground myself in the history. I've been working through a lot of art history and enjoying it a great deal. I needed to branch out in order to better understand the art though, so I got a copy of Margaret Rosenthal's biography of Veronica Franco, The Honest Courtesan ,as well as Franco's Poems and Selected Letters edited by Rosenthal and Ann Rosalind Jones. Just starting them, but it's certainly fascinating and dives right into to sociological issues.

 Medievalists.net posted a link to a thesis I found interesting today as well, so I figured I'd pass the link along. "Defining the Strano, Madness in Renaissance Italy" by Nicole Cama. There actually is a relationship as both are in some way dealing with the Other. Certainly a round about way of familiarizing myself with Italian history, but I'm having loads of fun dipping my toes in.

Tuesday, May 29, 2012

Yup, I'm lazy. . .

I decided last night that I would get over my lazy and sit down and finish painting the block printed fabric for the drawers. About an hour in, when I had only painted about a dozen of the 300 or so motifs, I decided I truly was just not that ambitious.  I decided that one color block printing was going to be just fine for the drawers.
My husband helped out by wandering by and telling me he preferred the plain version. While I don't usually listen to "Khaki Man's" opinion, as he is a firm believer in less is more and thus my antithesis, it was late and lazy was looking for any excuse to not have to do more work. So, drawers have been cut and sewn and are blue on blue. I just need to decide on some lace for trimming and they're all done.

However, I couldn't let the already decorated fabric go to waste. The silk I had planned to use for the saccocia got put away and I used the painted linen instead since I had just a small amount of it. It's lined with the block printed linen and the tie is the herringbone silk ribbon I plan to use for trim. This is my third saccocia. I liked the size of the orange silk one from my last dress so well that I just traced around it. the linen will certainly be more washable.

Monday, May 28, 2012

Home from Quest, and I (mostly) finished the dress.

I didn't end up wearing it because it was far too wet and muddy. Not to mention the fact that I forgot to bring bodice laces.  Oops. They actually cancelled the event early Sunday. We're crazy and stayed until today anyway. The weather got loads better once the event was cancelled and my tent dried out before I packed up so that was a happy thing. I still need to do the guards on the skirt, but the eyelets are all done and the skirt is cartridge pleated to the bodice so it is in fact a dress at this point. I'll get a picture up as soon as I dry out and unpack and snuggle my kiddos a bit more.

Thursday, May 24, 2012

Still have far too many eyelets to do

I have the eyelets on the front edges, just need to do the dozen on the back piece. Shoulder seams are complete. Still skirtless, however. Not sure I'm getting this done by Saturday. Tomorrow is the drive to and from my husband's brother's graduation. Still need to get kids ready to go and then pack for Saturday's camping trip once I get back. ACK! I may end up wearing my pseudo-Persian or Viking dress with unfinished embroidery. I really, really have slim pickings for camping outfits.

Wednesday, May 23, 2012

Finished the guards on the camping dress bodice.

I need to spot clean the glue I used to tack the guards into place where I changed my mind on the layout, but other than that the guards are done. Stitching them in place went much faster than the ones I'm couching down with gold on the cappotto.  Need to stitch the eyelets for the lacings and then I'll  double check the fit of the shoulder seams and stitch them. Sleeves are close to done and I have lacing rings to attach. Hoping to get the skirt stitched on tomorrow. I may or may not get the skirt guards on before the event on Saturday.

Yes, I know my lacing position is a bit odd and should be further back and more angled to match the guard. With my body shape that just isn't a particularly good fit. When Noelle drafted this pattern for my red dress last year we moved it more forward under the arm. Looking at my bodice patterns spread out is always weird for me. I have the shoulders of a football linebacker and am just such a broad body that it odd to compare what fits me with what other's bodices look like. I swear it looks right when on. Same deal with the inner most guard, it looks kinda wonky laid out flat with the two upper ones angling off and it going straight across but once on it looks good.

Tuesday, May 22, 2012

A couple of quick cauls

I'm working on a working class dress to wear this weekend for Quest for Atlantis in Barony of Gryphon's Lair, so the IRCC isn't getting all that much time, but I'm determined to keep plugging away. With that in mind I made two quick cauls out of pre-embroidered fabrics. They're just simple circles gathered to a fitted band. This one has a pattern of eyelets done in brown thread. I cut the circle far too big and it hangs lower than it should so I cut the second one smaller. It has whitework circles on it. I'm considering adding pearls but we'll see. I'm going to wear it this weekend (assuming I finish the dress.) Hey look! I got the feather's curled. The white one isn't cooperating much. I might remove it. Considering making a hat jewel as well.

The dress for camping this weekend is a blue/green teal linen with spice guards. I had intended to do only minimal boning/interlining since that is the more correct look. My vanity got in the way, however. As a super fat person who has had 4 children I really like the smoothing and support of a boned bodice. So it has 2 interior layers of canvas and one of wool felt and not as many bones as my court gowns but still quite a few. The bodice is assembled, just needs eyelets done and guards attached. The guards are today's project. Eyelets will probably get done Friday since we're planning a trip to my husband's brother's graduation and it is a good car project.

Since I'm planning to machine sew the drawers, they might get started today too. Not sure yet. I got the fabric stamped and after counting over 300 of the stamps that I'd need to go back in with gold I decided to be lazy and leave it as is. I like the stamping a lot. I think I'll try it again for an outer garment. Then I'll go through the extra work of adding additional colors. As a first attempt I'm pretty satisfied with it.
Makes a really nice tablecloth too.

Monday, May 21, 2012

First experiments with block printing

I think it is going to look much better once I paint the gold into the center of the blue outlines, but I'm relatively pleased so far. Lots more stamping to go. Yet another one of those times that I wish I was smaller and needed less fabric to make things in my size. At least I'll get lots of practice.

Sunday, May 20, 2012

I feel like Gilligan

The Castaways must have been a lot more persistent than I ever gave them credit for. Cleaning and sanding this silly coconut is taking much more time than anticipated.

Friday, May 18, 2012

Starting the signet

I know it doesn't look like much yet, but I'm trying my hand at making an intaglio in order to make a signet ring. It's slow going. I'm using jasper to match the stones I intend to use in the girdle. Jasper isn't the normal stone used for signets with carnelian, agate, and onyx being much more popular, but there is evidence the Minoans carved seals from it as early as 1800 B.C (at least according to Wikipedia, so take that for what it is worth.) Jasper is a type of chalcedony and closely related to carnelian though, so I don't think it's the craziest choice.

I'm doing the inverted seeblatt/krin from my heraldry. It's perfect as it is such a simple shape. Intaglio are basically the opposites of cameos with the gem being engraved. They're perfect for signets used for sealing as they leave a raised symbol in the wax. Gems from ancient Rome were re-used very commonly for signet rings, and signets didn't always have the heraldry of their owner, but I figured I'd give it a try. I haven't quite got it carved deep enough to leave a good impression yet, but it is getting there. I've been using a combination of new and old techniques. I mixed up a slurry of emery (I scraped it off some sandpaper) and used files which is the old way. I've also attacked it a bit with my Dremel. I actually like how the files and grit work to be honest.

To see someone that actually knows what they are doing, check out this video posted by the Getty Museum on gem carving. The artist is doing a reproduction of a Roman gem with a scarab on one side and an intaglio of a man adjusting his sandal on the other. It's gorgeous. 

I'm just hoping to not break this and get something sorta heart looking if you squint really hard.

Warm hands will be important later if not now.


'Tis summer yet, a Snuftkin be your lot!
But  'twill be winter one day, doubt ye not.

I'm loving that bit from a poem by Sir John Davies. A favorite of Elizabeth I, his poem has one of the earliest mentions of the snuftkin, snuffkin, snoskyn or muff.  What fabulous names.There's something sort of Willy Wonka to them.

I was also reading this article today:, Rainbow for a Reign:The Colours of a Queen's Wardrobe by Jane Lawson. Published in 2007 in Costume it is flat out scrumptious. It has a selection of the items from Elizabeth I's New Year's gift rolls examined by color. There are quite a number of snuftkins in a wide range of colors. Pinks and purples and oranges and tawnies with passemaine and embroidery. The descriptions are totally delicious. Now I'm thinking my muff might be a bit plain.

I love the Italian style buttoning muff though and with the buttons and border I hope it bears at least a bit of a resemblance to the inspiration woodcut from Vecellio. I decided on some of the original buttons I made for the loose gown with the brighter yellow and no blue between the spines. I've got 12 dozen, they may as well get used for something. I made the shanks and button loops blend into the fur, so they are done with brown thread. just simple buttonhole bars that curve, using a wooden gauge for size just like my last muff. I guess we have to call me an addict now with three of these now. Warm hands are nice to have and they look rather lovely hanging from a girdle. I'm certainly happy with the result. I suppose I will have to live with the Venetian name of manizza or the Florentine manichino. Snuftkin is just so much more whimsical.


Wednesday, May 16, 2012

One more heart to stitch. Also, I have a hacksaw

My children have once again made off with the batteries for the camera. Probably just as well, there really isn't much to take a picture of. I am so very, very close to finishing the leather applique for the muff but it isn't done yet. Hopefully I'll finish it before I go to bed. I still need to mop the kitchen floor though, so it may have to wait until morning.

I really want to finish it though because I promised myself a goofy reward. We do the Bountiful Baskets fruit/veggie coop and last week I got a coconut as part of a tropical pack add-on I bought. You may remember my discovery of the magical historical coconut cup back in February. The pre-done coconuts I was going to buy then were back ordered and the plan never came together. But there is a coconut on my counter. There is a hacksaw in my toolbox. There is a sheet of copper in my craft room. Once the applique is done I am determined to get into some mischief with these items. Then there should be something to take a picture of. Assuming I can steal the batteries back from my children.

Tuesday, May 15, 2012

Gilding under glass

Italian verre eglomise devotional pendant 1600 Metropolitan Museum of Art

Reading Cennini is giving me far too many ideas. Chapter 172 is about making mosaics from egg shells and the quills of feathers. It also has an early description of how to do verre eglomise. Cennini refers to it as mosaic for the adornment of reliquaries, but it is the layered working of gilded glass that will eventually go by the French term.

It was a very popular technique used for religious pendants between 1300 and 1600 and the Italians were well known for it. The Victoria and Albert have a number of pieces. Some of my favorites in this time period  that turned up in a quick search:
 German reliquary pendant 1550-1600. 
Spanish or possibly Italian pendant, early 17th century.
1550-1600 Italian pendant.

What really has me intrigued, however, is this rosary from the V&A's exhibition "At Home in Renaissance Italy" borrowed from the Museo Civico d'Arte Antica e Palazzo Madama in Turin. The rosary beads are made in two parts with gilding and painting of the verre eglomise type in between, held together by metal settings.
http://www.vam.ac.uk/vastatic/microsites/1487_renaissance/devotion.html


Chris Laning did a fascinating series of posts on her Paternoster blog regarding this and a similar piece. Crystal gazing.

So, I've been pondering how exactly I would go about making something like that. I think I have some ideas involving Cennini's gilding instructions, glass cabachons, bronze tape, a soldering iron, a drill, and a bit of crazy. I'm certainly looking forward to trying. First I've got to finish the leather applique, however, so I don't keep adding to my pile of half finished projects. Just one and a half of the original six motifs left to do.

Monday, May 14, 2012

About half way through with applique

Doesn't look like much, but this was my free time today. I machine tacked the linen interlining to the upper fabric and stabilized the blue with a fine line of glue so it wouldn't continue fraying. Once complete, the edge will be bound with fur and then covered in ribbon so I'm not worried about it eventually, just while stitching. I also needed an edge to stretch since the border is so close to the edge of the fashion fabric, so I cut the linen extra large. I don't need a very tight fabric for applique so I went for speed and put it in one of my  Q-snap frames rather than stretching it on a better frame. I should finish the stitching tomorrow or Wednesday.

I'm using 1000 denier Kanagawa silk in turquoise and a glover's needle to quilt the leather. It is a heavy 3 ply filament silk with a great deal of shine. I'm just doing a basic running/stab stitch but I want there to be significant contrast between it and the leather and no question that "I meant to do that."

I'm considering changing the buttons and either doing them in the turquoise silk or possibly leather covered ones. I need to see how it really looks with the fur and ribbon in place. While I'd like it to coordinate with the eventual loose gown I want it to look good on its own.

In other news, I never showed off the pictures of the bag I made for Baroness Jennet. It is a version of the silver dragonfly and thistles of her heraldry. I talked about it here and it is one of my 50 favors and tokens for A and S 50. So here's the picture of it before I forget again.


Sunday, May 13, 2012

Some progress on the muff

I finished cutting out the rest of the leather applique for the muff. Now to start stitching it into place. I have some turquoise silk that I'm considering using but need to test how it looks first.

Someone asked me about leather applique and if it was a period technique for apparel. There is the absolutely gorgeous suit from 1615 held in the Museo Parmiagianino (Reggio Emilia)  featured in Patterns of Fashion that is a carnation/gillyflower pattern done in ivory suede on red silk. The stitching is pink silk. It is incomplete and some of the pants do not have the sections between motifs cut out yet so the construction details are apparent.

I am doing a bit different technique. The original involves layering an entire sheet of leather over the fabric, sewing it into place, and then cutting out the void spaces. It is much more of a reverse applique technique. As I am doing a border rather than an overall pattern, cutting out the decoration and then stitching it into place in regular applique seemed more appropriate. Not to mention used far less leather. For an absolutely gorgeous loose recreation of the doublet as well as sketches POF, check out this project diary at Stimpzilla Sumptuary.

Saturday, May 12, 2012

Typing problems

The first column of my computer is wonky. No typing of  the first vowel & so no post tonight.

Friday, May 11, 2012

Leather applique on the muff

Very much in the middle of this project, but thought I'd check in and show you what is going on. I considered doing a rounder thinner muff this time around rather than the envelope style with the buttons, but well, I adore buttons. My other two muffs have been pretty much about the fur and fabric with some simple trims, so this time I wanted to do something a little more exciting.

  I went looking through modelbuchs today for pattterns. Rather amusingly I was doing the same thing basically a year ago exactly. Just like then, we're headed to the Ren Faire tomorrow for my Mother's Day present. Man, I'm predictable.  This design is from Giovanni Ostaus' Perfection of Design. (which I also have babbled about before.)  Page 56 of the PDF. Rather than drawing it up, I just zoomed the pattern to the size I wanted, printed it and cut it out directly. Then I traced it on to a thin maize colored pigskin leather. I've still got several more lengths of it to cut out, but it's going pretty quickly. I'm stabilizing the blue silk with an interlining of linen and then lining it with a faux mink reused from a thrift store jacket. My other muffs are vintage fur, but I picked this up to do hats for my kids and it has a large piece that is perfect for a muff, while still leaving large pieces for the hats. Since I had it pulled to pieces and out, it was convenient and I grabbed it rather than piecing fur. It's actually a really nice fake.

I'm going to further define the applique with rows of the silk herringbone ribbon on each side and coordinate the muff my loose gown a bit by using the same style buttons. I certainly had practice making them. I figure the more pieces I have that coordinate the more mixing and matching I can do.


Thursday, May 10, 2012

Itty bitty bows

I didn't get to the block printing today. I'm thinking more and more that I will actually carve a stamp. So that I had something to blog about I finished up the earrings. I picked up some ribbon embroidery silk ribbon to do the bows. Should be durable and it is the perfect thickness.

Since I already had a couple of pairs of pearl drops I wanted to do something a bit different. I loved the interesting pair in one of my favorite accessory rich paintings, Montemezzano's Portrait of a Lady with a Squirrel. The 3 pearl drops at the bottom and large gold component in the center are fun. I really like the bows as well. While Caravaggio is not usually really a good costume reference painter, there are a set of similar earrings with bows in the Judith painting I was looking at last month. The ones in the Montemezzano have heavy hoops but I was concerned about weight with the chandeliers and the pearls and crystals so I settled for simple leverback findings.

Not much else to say, but here's my second daily post. I have $2!

Wednesday, May 9, 2012

New plan-- back to daily updates, and on to some printing.


Block printed linen in Victoria and Albert Museum.  Italian 1350-1400   
 I just haven't been doing as well with accomplishing things this time around and I'm beginning to think that it has something to do with not having all the mini deadlines. So, that is my new plan. Regardless of if I finish something or not I absolutely have to find something interesting to say and post a picture every single day. For every day I do it I get a dollar towards buying Moda a Firenze.  There's less than 100 days left, but if I'm close I get to buy it anyway.

Cappotto is basically stalled with the second guard to go. I think I'm going to put it aside for awhile and actually finish something before I get bogged down in it. I was going to do the corset next and start the dress so I'd feel really accomplished, but I have lost 13 pounds in the last 3 weeks (YAY!) so I'm going to wait as I had originally planned and do it really close to the end. I know that isn't the best plan and puts me in danger of not finishing the dress, but I really don't want a dress that doesn't fit when I'm through

So, tomorrow's plan is to try some block printing of fabric using the instructions from Cennini's Il Libro dell'Arte. He discusses block printing on fabric in chapter 173 "The way to work on cloth by printing from a shape in color (lavorare colla forma dipinti in panno.)"  The linen is stretched on a frame and then the color is applied to the block with the palm of a gloved hand. The block is brought to the fabric from the bottom and burnished by another board on top in order to make the impression. Once the outline is in place the fabric is removed from the frame, spread out on a table and other colors "without body" are applied with a brush.  I think my Q-snap quilting frame that I use for large scale embroidery will make a good substitution for the wooden stretcher frame. I had considered carving a block, but I might cheat and use some large stamps instead. 

The plan is to print enough blue linen to make drawers. Cennini specifically says when using light blue fabric (biava) to use biacca or white lead for the outlines rather than black. He follows that up with basically says to mix your colors with the grounds as you fancy and feel go together, "one thing will teach you another, both by practice and the knowledge given by your intelligence. The reason? that every art is in its nature ingenious and pleasing: che ne piglia se n'ha (he that takes, hath). And similarly the contrary happens."

I will be doing white (not lead) for my outlines and then adding some gold for color. Guess we'll see how it goes. The way I figure it, if I do a terrible job, they're drawers and really won't be seen much anyway. I've been dieing to try printing fabric and collecting documentation on it for quite some time now so figured now is as good a time to start as any.


Friday, May 4, 2012

Finished the glove mock-ups

Just to be upfront with this, I have made all of 2 previous pairs of gloves and it is not an area I have done much research on. I am using instructions and information from Duke Alen Elegil KSCA's site http://cleftlands.cwru.edu/Alen/Elizabethan.html
Franchesca Havas' very informative http://www.glove.org/  Tammy Dupois's demonstration of glove making http://www.renaissancetailor.com/demos_gloves.htm and a little bit I picked up working with the late Sandra Stiglinski at the Utah Shakespearean Festival when I made my first pair of gloves about 12 years ago.

 I wasn't particularly pleased with my last pair of gloves made during the ACC. I took far too many shortcuts. I didn't pattern them, taking them from an older pair of gloves I made about 12 years ago. I tried to sew them entirely on machine and it just didn't make a satisfactory result. This time I decided to do as nice a pair as I could manage with the skill and supplies (the blue of my leather I currently have isn't accurate in that it is tanned pigskin rather than an alum tawed and the color isn't documentable. I bought it because it was pretty and matched my ACC dress and I have enough left to make another pair of gloves so I'm trying again.) So, first of all, I needed to draft a pattern and I wanted it to be as historically accurate as possible with a broad thumb and gauche rather than the oval opening with square gusset of a modern thumb. I sort of synthesized the drafting directions from glove.org and Renaissance Tailor to start with. I made the trank and forchettes pretty much as described, but then drew in the curve of the web of my thumb and looked at the basic shape of the gauche from Alen's gloves in order to create the thumb hole. Mine is a bit different because I have double jointed thumbs and have a tendency to rotate my thumbs a bit oddly so I adjusted the shape a bit for comfort while keeping the round projection of the thumb that you see on the back of the hand in period gloves. Mine's not too different, just not as symmetrical as illustrated in the patterns. Rather than using the methods for creating the thumb described in any of the tutorials I just draped it directly.


Here you can see the modern thumb with gusset versus the more period thumb. The white gloves are my first pair of gloves, made in  vinyl and sewn entirely by machine. I'm actually really happy with them and they are my rapier gloves (well, they were until I cut one apart to use as a pattern for the ACC gloves.) My sewing machine does not, however, perform as nicely as an industrial machine and my second attempt (years later) at machine sewn gloves was not as happy and I've cut them to bits so you won't be seeing pictures.

The green glove is my mockup of the new pattern. I was not as careful as I should have been in cutting the fingers apart (did it at the dentist's office) and the forefinger and pinky are too narrow and the ring and middle finger are too thick. It's an easy fix and doesn't change the pattern, just means I need to be more careful and I should avoid the slight twisting this causes in the forefinger and the not so shapely fingers.

Here's the original pattern minus one of the forchettes. My youngest daughter ate that. I'll be cutting the mock up apart and using that anyway so I'm not too frustrated by that.

I still need to decide what I'm going to do with the cuffs. Italian gloves are so much plainer than the English examples, without the extended fingers and the embroidery and lace. There do seem to be a few with some pinking and snipping on the turned up cuffs so I may do some of that. I have decide to do exterior assembly and will be doing a knotted buttonhole stitch for construction rather than the plain blanket stitch I used for the mockup. I've also got a pretty turquoise silk that is 3 or 4 shades darker than the icy blue of my leather, so it should be slightly decorative.

I need to start sewing clothes for my kids for Uprising in June. 4 kids and a week of camping when they have no garb at all is going to keep me busy for a bit and I won't get to sewing the real gloves this weekend. At least I shouldn't. I'm really, really tempted to though because I can't wait to see how they turn out.

Wednesday, May 2, 2012

Reticella reticence

I've been staring at vintage lace all day trying to make myself cut into it. I bought a table runner with some staining and broken brides with the intention of upcycling it and now I'm having second thoughts. I know that the linen is only from the 1930-50's but cutting into something someone spent so much time making is rather agonizing. I was actually disappointed that it was in better shape than the auction described.

I also have about 6 yards of edging that is going to be soaked and sunned to see if it will approach white again. Then I can agonize over whether it will be part of the camicia, the apron, or if I have enough for the ruff. And I can feel guilty about plans to cut it too.

But, back to my table runner. The plan for it is to turn it into a stomacher (for lack of a better word.) In looking at several of the open front Venetian gowns, there is something going on in the V that looks either like lace or embroidery. It is especially evident in this Montemezzano.

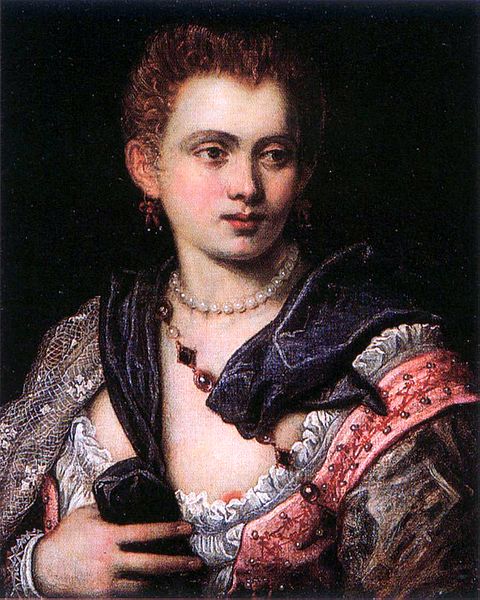
There's no denying that that is a lace overlay covering either a red undergarment, possibly a stomach band, or a red insert. There are several others that are not as visibly lace but certainly have the same look.  Veronese's "Lady with a Heron" and the super yummy seashell ultimate extreme dress, Veronese's "Woman Holding Gloves," both have something that sure looks lacey-ish. While these don't have the falling ruff and shoulder ruffs I want for my dress, there are some woodcuts that seem to have something other than plain white camicia happening in the open front, so I'm hoping I'm not mixing up decades too much.

The other plan for the table runner is to make some cuffs. This is probably my Russian persona showing, but the thought of just taking lace on to the bottom of the sleeves, as I've seen many recreations of dresses do, has never set well with me. Cuffs and collars are ornate, removable, interchangable and very much separate in my world. Therefore, I was beyond thrilled when I came across this pair of 16th century Italian lace cuffs at the Met. (Thanks to Ashan Ekins and her Pinterest board.)

In looking at a variety of portraits, many of the straight sleeves for the open front gowns have buttons along the lower arm. I rather like the idea of delicate buttons on sleeves and on lace cuffs. We'll see how they go and if they're more bother than they are worth. I'm certainly going to be doing buttonhole stitches for the next little while as a fix brides, create new edges for old lace, and make little button loops. Should be fun.

Just to prove that I actually have gotten a few things done, here's a look at my new necklace. It's just a strung selection of goldtone beads and a rather interesting blue jasper with gold veining. Many of the open front Venetian gowns have 2 or three graduated necklaces. There is the ever present pearl choker, sometimes a medium one and then a longer one with a large pendant either free hanging or pinned to the open lacing (or closed bodice depending.) The majority are either pearls or gold chain, but there were a couple of woodcuts and a few paintings that seem to show something other than that. This is sort of loosely based on Moroni's Portrait of Isotta Brembati.   Hers has the colored stones and rice shaped gold. I had the seashelly flourishes that I substituted for plain rounds. The pendant isn't as large as I would have preferred, but it matched. I've got some silk ribbon I'm going to use for bows on some earrings and I am considering making a little bow brooch for use to pin the necklace onto the bodice like Isotta's.